Technique Cards (Free Download)
Three hands-on skills, one card. They are not equal, so treat them in order of what actually changes outcomes. The inhaler routine is the one that must be right because the medicine simply fails when it is done wrong. Peak flow and home listening are useful add-ons, not requirements. Practice all of them on calm days, never in the middle of a flare, because technique fades and the version you can do without thinking is the one that holds when it counts.
1. Inhaler and spacer, the one that must be right
The card behind The Medicine Is Fine, The Delivery Is Leaking. Stick it where the inhaler lives until the routine is automatic.
With a spacer (always use one):
- Shake the inhaler. Prime it (a test spray into the air) if it is new or unused for a while.
- Attach it to the spacer. Mask? Seat it gently over nose and mouth, good seal, no gaps.
- Breathe all the way out, away from the device.
- Seal lips around the mouthpiece (or hold the mask in place).
- One press, then breathe in:
- Older child: one slow, full breath in, then hold about 10 seconds.
- Young child or mask: breathe normally for 5 to 6 breaths.
- Wait 30 to 60 seconds, then repeat from step 1 for each puff. One puff per breath.
- Steroid (preventer) inhaler? Rinse and spit with water at the end. Wipe the mask.
Dry-powder inhaler (no spacer): the opposite breath, one quick, deep, forceful breath in to pull the powder, then hold. Confirm the loading step with your pharmacist, it varies by brand.
Quick leak-check, the common misses:
- ☐ Forgot to shake.
- ☐ Pressed before or after the breath, not with it (a spacer fixes this).
- ☐ Breathed in too fast (slow for a metered inhaler, fast only for dry-powder).
- ☐ Skipped the hold at the end.
- ☐ Two puffs in one breath.
- ☐ No rinse after a steroid inhaler.
Have a clinician or pharmacist watch a real demonstration, once, and again at later visits. Technique fades, and almost everyone doing it wrong is sure they are doing it right.
2. Peak flow, a useful optional trend tool
The card behind Peak Flow Is a Trend, Not a Verdict. Optional, but if you use a meter, post this by it. The trend over weeks is the point, not any single number.
Take a reading:
- Slide the marker to zero.
- Stand up (or sit up straight).
- Full breath in, as deep as it goes.
- Seal lips around the mouthpiece, tongue clear, no leaks.
- Blow out hard and fast, one sharp blast, like blowing out birthday candles.
- Repeat. Best of three is the number you record.
Find the personal best: once a day, same time, for 2 to 3 weeks while well controlled, best of three. The highest number is the personal best. Re-check as your child grows.
The zones, worked for a child whose personal best is 280 (the printable has blanks for your child's own numbers):
| Zone | % of best | This child's number | Do |
|---|---|---|---|
| 🟢 Green | 80 to 100% | 224 and up | Normal day |
| 🟡 Yellow | 50 to 80% | 140 to 224 | Plan's yellow steps, note what changed |
| 🔴 Red | under 50% | below 140 | Emergency plan, get help now |
Do that arithmetic once with your own child's personal best, write the three numbers on the printed card, and nobody has to compute percentages at a tense moment.
If a reading looks suddenly low, check for a lip leak or tongue over the mouthpiece, a weak effort, a slow breath instead of an explosive one, or a different time of day than the baseline. A sudden lone drop earns a second blow before a reaction.
Below half of the personal best, or struggling to speak, blue lips, or hard breathing not easing with the reliever, means the emergency plan and getting help now.
3. Home listening, an optional bonus
The card behind Listening to Lungs at Home. The most optional of the three. The real monitor is watching how your child breathes (What Working to Breathe Looks Like). Listening only adds a hint on top of that, and it can never tell you a child is fine, because an obstructed chest can go quiet, so absence of a wheeze never means absence of a problem. Never use it to talk yourself out of acting or calling the doctor. Practice on well days.
How to listen:
- Quiet room, child sitting up and calm.
- Diaphragm (flat side) on bare skin, not over clothes.
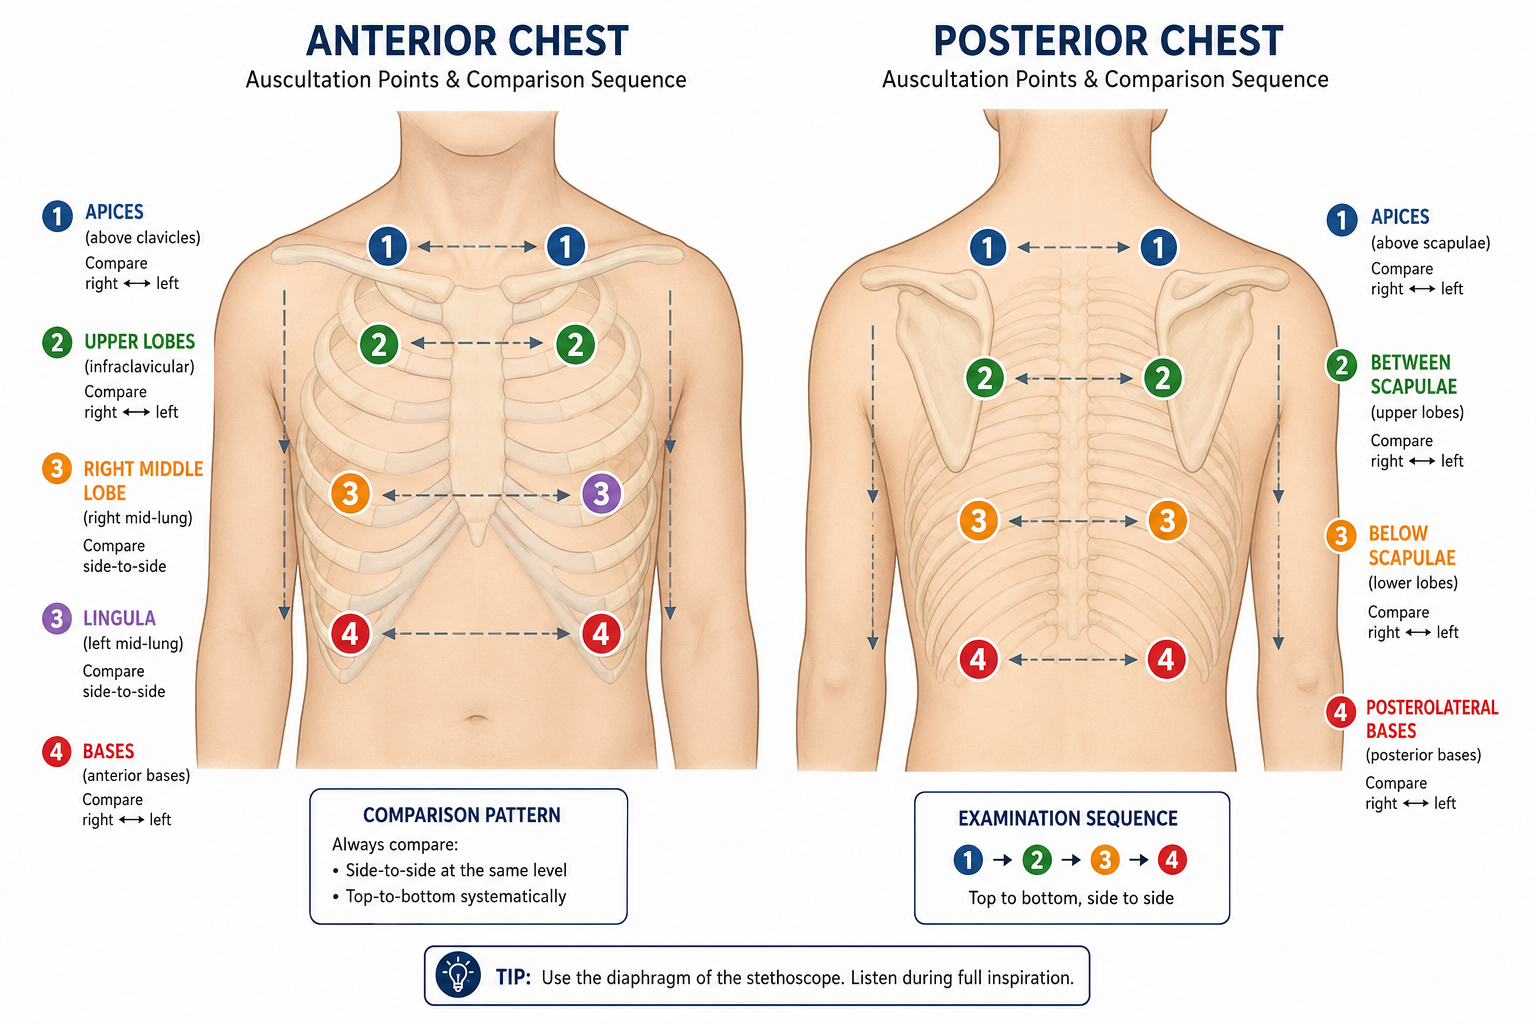
- Upper back, one side, then the same spot on the other side, comparing left against right.
- Work top to bottom, a few spots each side.
- Listen through a full breath in and out (asthma sounds are mostly on the way out).
- Write it in the journal.
The map below shows where to place the stethoscope. For home listening you mainly use the back, working top to bottom and comparing left against right at each level.
What you are hearing:
| Sound | Like | Means |
|---|---|---|
| Normal | soft, breezy air | nothing extra to hear (judge the child, not just the sound, a quiet chest can still be in trouble) |
| Wheeze | high musical whistle, breathing out | narrowed airways (early asthma sound) |
| Crackles | wet pops, crumpling cellophane | fluid |
| Rhonchi | low snore-like rattle | mucus (may clear with a cough) |
| Stridor | harsh, high noise breathing IN | upper-airway, emergency |
At regular visits, ask the clinician to listen at the same time and compare notes, so your ear gets reliable.
A harsh noise breathing in (stridor), or a grunt at the end of each breath in a young child, means hard work to breathe and the action plan red zone. See What Working to Breathe Looks Like.
Where this fits: operationalizes The Medicine Is Fine, The Delivery Is Leaking, Peak Flow Is a Trend, Not a Verdict, and Listening to Lungs at Home. Part of The Asthma Toolkit.
Print it. Keep it where each tool lives, the inhaler card by the inhaler, the peak-flow zones by the meter.
The download is free, one email unlocks it and the whole Asthma Toolkit.
Comments ()